21 Nov 2022, 00:00

Using HIBP to detect credential stuffing attacks

A few weeks ago I was asked to have a look at a system. I can’t really share which system but it is not really important to the story. This system is not that unique in any specific way. Users can register an account. Users can login and do things. All the things one would expect from a website that offers a service these days. I must say the people running the website even had things pretty well setup. There even was some monitoring. Now normally this system just runs. Developers develop new features. Every once in a while something breaks.

But on a given afternoon something strange started happening. Their monitoring alerted them that there was something going on. The error rate on their login endpoint was trough the roof. That is to say 99.x% of the requests to that endpoint resulted in a 403 or a 429. Something was clearly up.

As it seemed that the rate limiting was nicely kicking in they did not worry to much. On top of that most of their users have Multi Factor Authentication enabled. But still it got them wondering. What was going on. As the requests kept coming in we decided to start collecting some data.

The first thing we wanted to know was how many of the users that tried to login actually had an account on the system. This was just a very simple extra lookup on the endpoint. After having this run for about an hour it turned out practically none. Of all the failed login requests only 0.01% (rounded up) had an account on the system. This in itself is already strange. And it started to smell like credential stuffing.

To quote wikipedia:

Credential stuffing is a type of cyberattack in which the attacker collects stolen account credentials, typically consisting of lists of usernames and/or email addresses and the corresponding passwords (often from a data breach), and then uses the credentials to gain unauthorised access to user accounts on other systems through large-scale automated login requests directed against a web application.

Now we had the first part of the credentials (email addresses) but what about the second part. The passwords? Well for that we started adding a tiny bit more code but still just a few lines. For failed logins we also looked up if the password appeared in the Pwned Password lis of haveibeenpwned.com. This got deployed and we let it again ran for a little while. This showed that 99.98% of passwords used in failed login attempts were already known. Now this is not definitive proof. But if it looks, swims and quacks like a credential stuffing attack it probably is a credential stuffing attack. In any case it gave us enough confidence to conclude that somebody managed to get ahold of some data breach (most likely a breach already in haveibeenpwned) and was performing a credentials stuffing attack against the service.

After all this fun we had what we needed to hand the issue over. And they started to block IP addresses more aggressively if they did a lot of failed login requests with distinct usernames and >90% of the used passwords appearing in haveibeenpwned. This brought down the error rate quite fast. The attack went on for a while longer but eventually stopped.

This experience got me thinking that there might be something here where we could utilise such information better. A system where such statistics are collected and stored could make use of this. By lowering the rate limit for IPs that make request that look like credential stuffing attacks for example. Or making it visible for the administrators running the instance how many of the login requests fail or exhibit this behavior. It for sure is something I’m going to think more about more.

13 Oct 2022, 00:00

Strict-transport-security analysis

I worked with the Strict Transport Security header when I was still at Nextcloud. However my interest was reignited this week after attending the Practical TLS and PKI training by Scott Helme. So I started digging into the crawler.ninja dataset to see what I could get out of it.

What is the Strict Transport Security Header?

But first things first. For details read the mdm docs. But in short it comes down to a header a webserver can set on sercure requests to tell the client to only connect securely to that host for a given time. Lets jump right into an example:

Strict-Transport-Security: max-age=63072000; includeSubDomains; preload

This header will tell the client to connect only securely to this domain (and all its subdomains) for the next 63072000 seconds. So even if you would manually navigate to http://DOMAIN.TLD the client would just rewrit this directly to https://DOMAIN.TLD

Pretty neat!

Preloading

The header is pretty neat and will make sure in the future you connect only securely to your favorite websites. However, there is a tiny edge case. The first time you access a website your request (can) still go over the big bad unsecured web. To solve this there is preloading. Anybody that meets the criteria can head over to hstspreload.org and submit their domain. If your request meets the criteria it will then be added to the big preload list that for example chrome and firefox use. As the name suggest this list is preloaded so if you have never been to https://DOMAIN.TLD but DOMAIN.TLD is in the preload list. Your browser will still always connect securely.

The actual analysis

Now that we have the theory behind us. I wanted to see how the top 1 Million sites were doing. So I fired up a database imported the crawler.ninja dataset of October 11th, grabbed the chrome and firefox preload lists and wrote some code.

The first thing I checked was how many of the top 1 million hosts are actually being preloaded. For both browsers this was less than 1% (8496 for Chrome and 8297 for Firefox). I don’t know what I was expecting but for sure I was expecting more than this. Especially given that there are 178212 domains preloaded in Chrome and 138393 domains preloaded in Firefox. Which then also means that the fast majority of preloaded sites are not less often visited.

But it gets better. Of the 1M sites there are 26406 sites with a header that meets the preloading criteria. Now I understand it takes a bit of time to have your submission propagate. However similar numbers are observed in the dump from early June. If all those website would just go fill out the form we could tripple the number of preloaded sites of the most visited websites in the world in just a few weeks time.

Understanding the header

Of all the sites in the dataset a total of 202781 have the header set in some shape or form. This is quite significant. Over 20% of the 1 million most visited sites on the web use this header. But that kind of raises more questions than it answers for me.

Upon further parsing the header the most often seen value for the max-age directive is to to 31536000 (365 days). Followed by half a year, 2 years etc. But then we see that there are also 7659 headers that set the max-age to 0. In total there are a little over 11 thousand (excluding 0) entries that have a max-age less of 1 hour or less. For sure such times are only used when debugging and making sure it all work. But we can take this a step further. A little over 20 thousand (excluding 0) entries have a max-age of 30 days or less. Meaning that they must have some kind of faith in their ability to keep their site securely accessible.

Of course there is also the other side of the spectrum. 1 site is being future proof by having a max-age of 1.576.800.031.536.000.

All in all this is not giving me a whole lot of confidence everybody knows what they are doing with this header.

Is this a problem?

One could argue this is not that much of a problem anymore. Chrome and Firefox are switching over to a HTTPS first approach. So preloading might become obsolete anyway. However we are not fully there yet. On top of that having a long list of sites your browser just knows never ever to connect to over an unsecure connection is still something I can only see as a good thing).

The way forward?

So where do we go from here?:

  • Ideally we start with getting all those sites that are ready for preloading into the overall preloaded list. But it is of course up to the owner of the domain to submit themselves.
  • I would also argue that with the amount of crawlers out there we could find some way to speed up this preload process. Maybe if a host is seen multiple times in a momth with the requirements for preloading they could automatically be added?

Acknowledgements

This is now the second time I use the crawler.ninja data for analysis, so again a huge thanks to Scott for running that. Also thanks to Scott for acting as rubber duck when I was thinking trough all this and asking some valid questions on where to dig deeper.

06 Sep 2019, 00:00

Certificate lifetime analysis

Currently a vote is ongoing in the Server Certificate Working Group. The vote is with regards to the SC22 ballot that would limit certificate lifetime to a maximum of 1 year.

Due to the discussion and controversy around SC I decided to dive into some data to see what the actual lifetime of certificates is in practice. Now any selection will be biased to some degree. However taking the Alexa top 1 million crawls seems like a fair selection and should provide insights into the biggest websites out there.

The data source used can be found at: https://scans.io/data/scotthelme/alexaTop1Million/11-08-2019.zip

Still not all websites use encrypted communication (shame on them!) but of those 1 million in the dump 471665 do. Filtering out obvious bad/invalid certificates (CA certificates, lifetime of more than 825 days) and we are left with 411241 certificates to analyze.

For full transparency I am in favor of SC22 passing. But I am just curious of the current state of affairs in regards to the ballot.

Methodology

The data is imported into a local database. And after which all the sites are analyzed. Since we only care about websites with certificates all the other ones are discarded. Of the websites with certificates present only the first certificate in the chain in analyzed.

Certificate lifetimes

As a first step all the certificates were analyzed with their start and expiration date. This gives the most interesting metrics already. The first thing that pops out is the wide range. The minimum certificate lifetime found is 7 days and the largest is 825 days (the maximum allowed).

After some more number crunching this gives an average lifetime of ~261.6 days. With a standard deviation of 197.9 days. Clearly the spread is quite large when we consider certificate lifetimes. But the good news is that the «average» certificate would not have to be changed with regards to SC22.

Besides the average the mean is also an interesting metric. The center value at 50%. This is 190 days. Again a good sign that a majority of certificates is already doing what SC22 proposes.

How many certificates are we talking about?

This leads to the next question in the analysis. What percentage of certificates is valid for X days or less. Calculating this yields some interesting results. It turns out the number of certificates with really short lifetimes is small. But we see a huge jump at 90 days. 45.6% of all certificates has a lifetime of 90 days or less. Of course we know this lifetime all to well from Let’s Encrypt. And further analysis shows that this is indeed where the vast majority of those 90 days certificates comes from. That means that a lot of website are already using automation!

The next significant jump comes at 190 days. 54.6% off all certificates have a lifetime of less than that.

Followed by jumps at 356 (71.4%) and 366 (76.0%). Then there is a short climb. But already after 395 days we are at more than 80% of certificates. More than 90% comes after 732 days (~2 years). And more than 99% of certificates is covered after at 814 days.

What does this data tell us?

Now that we have all the data I’m going to make some assumptions to simplify things. I feel the 395 day lifetime of certificates is not far enough away from 365 days to warrant a special status. If you can renew your certificate every 395 days you can also do it once a year. My bet is the ~400 days are people that renewed their old certificate before the year was over and the provider of the certificate added the remaining days to their new certificate.

With the assumption above in consideration we can see that already more than 80% would fit within what is proposed in SC22. As the vast majority of certificates is already renewed once a year.

It also tells us that about 10% of the certificates have to be renewed somewhere in the range of 1 to 2 years. Which mean for at least part of those certificates the change to switch to certificates with a lifetime of at most a year is rather minimal.

Conclusions

This short analysis shows us that from the Alexa Top 1 Million the websites using a certificate at least 80% would not be affected by the SC22 ballot. This is of course already great news on its own.

Of course the remaining 20% is not insignificant. However I feel it is worth to point out that often discounts are provided for multi-year certificates. Which could be an incentive at the moment to buy them. But there can be many other reasons those 20% chose for longer certificates.

I hope this short analysis provided you with some insights. And I’m curious to hear what your thoughts are!

Acknowledgements

As the observant reader can already see the scan data was provided by Scott Helme, to be exact from crawler.ninja. Also thanks to Scott for going over my initial analysis and proposing some improvements.

01 Apr 2019, 00:00

Secure and Easy 2FA in Nextcloud

At Nextcloud we are focused on security and usability. Often these two things conflict. In the last few months we have been working hard to make sure that two-factor authentication is easy to setup and easy to use for all users!

Without much further delay. I’m proud to introduce the next step in two-factor authentication the It is really me - Provider.

Note: the app is still under heavy development. Still we appreciate testing and feedback!

This provider as a second factor just presents the user with a button with the explicit instructions when to press it. Now a legitimate user can safely press the button and an evil hacker will most likely follow the clear instuctions and try to find another attack point.

Writing a two-factor provider in Nextcloud is extremely simple. And I urge all developers to have a look at the code to see how easy it is.

The heart of the app is the Provider Class that implements OCP\Authentication\TwoFactorAuth\IProvider. This intreface guides you with just a few methods to contructs your provider. On top of that we also chose to in this case implement the OCP\Authentication\TwoFactorAuth\IProvidesPersonalSettings.

If we have a quick look at the actual functions you can see there is not much magic:

	/**
	 * Get unique identifier of this 2FA provider
	 *
	 * @return string
	 */
	public function getId(): string {
		return Application::APP_ID;
	}

	/**
	 * Get the display name for selecting the 2FA provider
	 *
	 * @return string
	 */
	public function getDisplayName(): string {
		return $this->l10n->t('It is really me');
	}

	/**
	 * Get the description for selecting the 2FA provider
	 *
	 * @return string
	 */
	public function getDescription(): string {
		return $this->l10n->t('Easy and secure validation of user');
	}

	/**
	 * Get the template for rending the 2FA provider view
	 *
	 * @param IUser $user
	 * @return Template
	 */
	public function getTemplate(IUser $user): Template {
		$tmpl = new Template(Application::APP_ID, 'challenge');
		$tmpl->assign('user', $user->getDisplayName());
		return $tmpl;
	}

	/**
	 * Verify the challenge provided by the user
         *
         * @param IUser $user
         * @param string $challenge
         * @return bool
         */
	public function verifyChallenge(IUser $user, string $challenge): bool {
		return true;
	}

	/**
         * Check if this provider is enabled for the current user
         *
         * @param IUser $user
         * @return bool
         */
	public function isTwoFactorAuthEnabledForUser(IUser $user): bool {
		return $this->config->getAppValue(Application::APP_ID, $user->getUID() . '_enabled', '0') === '1';
	}

	/**
         * Get the Personalsettings
         *
         * @param IUser $user
         * @return IPersonalProviderSettings
         */
	public function getPersonalSettings(IUser $user): IPersonalProviderSettings {
		return new Personal(
			$this->config->getAppValue(Application::APP_ID, $user->getUID() . '_enabled', '0') === '1',
			$this->initialStateService
		);
	}

All the other logic in the app is just more helper functions. Some php classes to allow enabling the providers. Some javascript to make the frontend work nicely etc.

Of course now you want to see how it looks:

Testing is much appreciated, as well as feedback, suggestions or pull requests. Please all leave them at github.

19 Oct 2018, 00:00

Two-Factor via Nextcloud Notifications

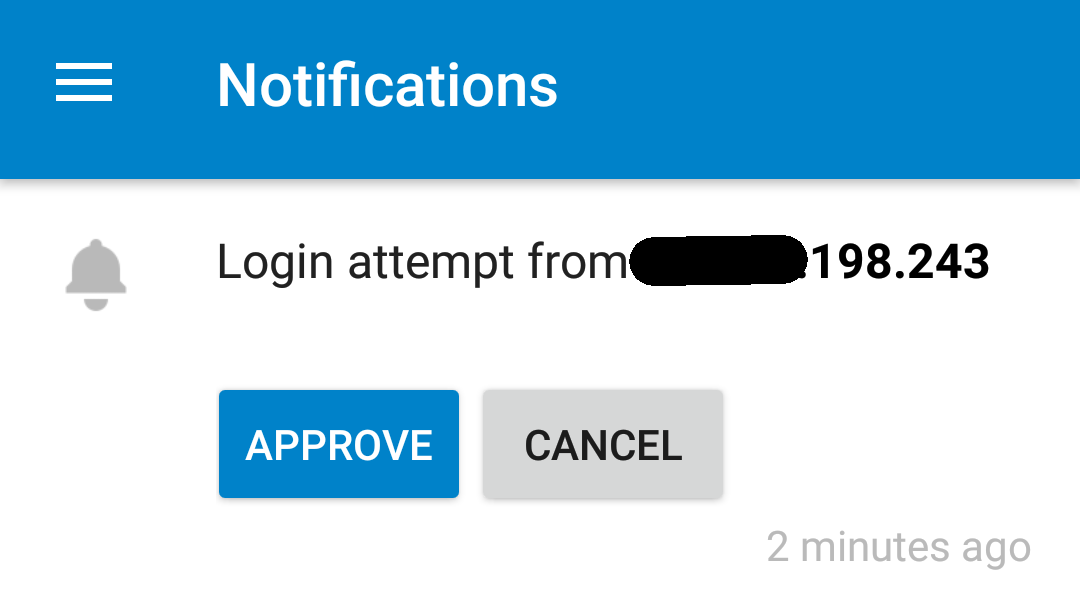
I’m happy to announce a new two-factor provider for your Nextcloud: the Notifications Provider. This provider utilizes your existing logged in devices to grant new devices access to your Nextcloud.

Note: the app is still under heavy development. Still we appreciate testing and feedback!

The flow is simple. You enable the provider in your personal security settings. Then the next time you log in you can chose to authenticate using a device that is already logged in to your account.

Now a notification is dispatched. This is delivered to all your devices, which means that you even get push notifications! That might just look something like:

You can approve or cancel the login from any of your devices. If you approved the login then you will be automatically logged in.

You can grab the app from the app store. And your feedback, suggestions or pull requests are welcome on github.

18 Oct 2018, 00:00

Towards a stricter Content Security Policy

A Content Security Policy (CSP) can be used to protect against Cross Site Scripting (XSS) attacks. This is done by having the server tell the browser what resources (executable script, images, etc) can be loaded from where. All this is told to the browser via a header, so if the actual page tries to do something it is not allowed the browser will block it.

At Nextcloud we have deployed a CSP for a while now that limited the resources to be loaded mainly to the domain your Nextcloud is running on. So by default it is not possible to load a random script from somewhere on the web.

We also added a nonce so that only javascript with the proper nonce set would even get execute by (modern) browsers.

Now because of the way a lot of our javascript code and a lot of 3rdparty javascript code was written we did allow unsafe-eval. Which allowed the execution of eval. This function is probably best known for being a well known XSS attack vector.

Dropping unsafe-eval

Of course I would not be writing this if we did not change anything about this behavior. Which brings me to Nextcloud 15 where we will disallow unsafe-eval by default in our CSP. This means that your Nextcloud will, by default, not permit execution of eval. Which results in a safer Nextcloud.

Information for developers

We have tried to make the transition to a stricter CSP as smooth as possible. However it could be that if you have written a Nextcloud app that you need to take action.

We are actively checking applications if they still work as expected and submitting pull requests. But of course help is appreciated. The easiest way to verify is to download the latest Nextcloud daily and try out your app. Be sure to have your developer tools open and keep an eye on the console. If the CSP is violated a message will be shown there.

If you need help feel free to mention me (@rullzer) on github or drop by in #nextcloud-dev on Freenode.

05 Sep 2018, 00:00

Improved AppPasswords in Nextcloud 14

The app passwords have been available in Nextcloud for some time now. They were first introduced when we added second factor authentication to Nextcloud, as you still want to have a way to connect your mobile and desktop clients to your account. In the early days this was all manual labor.

In the last year we have added support for app passwords to our mobile clients and the desktop client is following soon. This means that you authenticate when you setup your account using a normal login (with second factor authentication if required). A long random (72 character) app password is generated for you.

App passwords have several advantages. For example your real password is never stored on your devices. Also you can revoke access to a specific device in your security settings of your Nextcloud, blocking your lost phone from accessing your data. All pretty sweet.

AppPasswords original design

Now on to explaining how app passwords used to work.

Nextcloud never stores your password in plain text. And this means we also never store your app password in plain text. Roughly what we stored are three things:

  1. your username
  2. a hash of your app password
  3. your password symmetrically encrypted with the app password

This means that if you authenticate with your (userName, appPassword) we do the following:

  1. appPasswordHash = hash(appPassword)
  2. Lookup (userName, appPasswordHash) in the table
  3. password = decrypt_symmetric(encryptedPassword, appPassword)
  4. validate your password against your user back-end

Improvements

The main draw back of our first implementation is that when a user changed their password this means that all their app passwords are invalid. This is caused by the password being encrypted by the app password and only the hash being stored in the database.

So to overcome this issue we needed to find a solution to update the encrypted password without knowing the actual app passwords. The answer to this is public key cryptography.

This means a few changes as a first step we generate a RSA key pair. then we store the following:

  1. your username
  2. a hash of your app password
  3. your private key symmetrically encrypted with your app password
  4. your public key
  5. your password encrypted with your public key

Now the flow when your login with (userName, appPassword) changes slightly.

  1. appPasswordHash = hash(appPassword)
  2. Lookup (userName, appPasswordHash) in the table
  3. privateKey = decrypt_symmetric(encryptedPrivateKey, appPassword)
  4. password = decrypt(EncryptedPassword, privateKey)
  5. validate your password against your user back-end

Now to update your password we simply fetch all the app passwords for a user. And for each app password encrypt the new password with their public key.

Note: we don’t actually get the app passwords form the database just the rows with hashed app passwords. However, for this step we don’t rely on the actual app password.

Migration

To make things as smooth as possible we made sure that migration to the new app passwords is transparent to the user. Your old app passwords will not be invalidated. Instead the first time you use them they will automatically be converted. So from a user perspective nothing changes.

Future work

We feel that this improvement brings app passwords to a new level. Not having to re-authenticate your devices when you change your password makes the user experience a lot better.

Of course there is room for improvement. Currently the app passwords are only updated when you use our default user back-end. If you use for example LDAP then Nextcloud never gets told the new password. We are already working on improving this in Nextcloud 15! So stay tuned!

16 Jan 2018, 00:00

Introducing DropIt

A few weeks ago I was chatting with Tobias one of the Android engineers at Nextcloud. He mentioned how he oftened wanted to just share a file quickly with somebody or just share some text. Basically your own privately hosted pastebin.

This got me thinking about the amount of files that are stored on my Nextcloud that are just sitting there because I wanted to quickly share them with somebody but I forgot to delete them afterwrads. So long story short I decided to spend some time to write a little Nextcloud app that allows you to do this.

So I\’m excited to introduce DropIt to the world. It is available in the app store for Nextcloud 13!

The app ties together a lot of functionality already available in Nextcloud. There is a simple interface to upload your files or text (any help on the UI/UX side is appreciated!). And a cron job that deletes files older than 2 weeks.

So go check it out. And I\’m looking forward to all your pull requests to the github repository.

29 May 2017, 00:00

Nextcloud Desktop Client AppImage

Already back in October of 2016 probonopd made an AppImage for the Nextcloud Desktop Client. I must admit that back then I did not immediately try it out since I just run the client from source.

However, this has changed over the last few weeks as we wanted to start providing binary packages for Linux as well. When I was reading up on AppImage I got more excited. And since there already was a script to generate the AppImage I quickly built my very first AppImage.

So I\’m proud to present to you the Nextcloud Desktop Client AppImage. This is an AppImage of the latest beta.

Here is a step by step guide on how to run the AppImage:

  1. Download the AppImage
  2. Make the AppImage executable
  3. Run the AppImage

If you made it this far! Congratulations. You are now running the Nextcloud desktop client from the AppImage!

Feedback is welcome at help.nextcloud.com

12 Dec 2016, 00:00

Nextcloud 11 Preview Improvements

If you store images on your Nextcloud there is a big change that you have previews enabled. Previews are used for the tiny thumbnails in the file list but also for scaled down images in gallery for example. Because nobody wants transfer their 30 mega pixel photos all the time.

In Nextcloud 11 we have several nice improvements for you regarding previews. Including an shiny new app to pre-generate previews!

Serving previews

First of all we changed the way previews are served to the end user. If a preview was generated we would first construct an image object in memory and then serve the data from that image to the user. This created a lot of overhead.

So the first step is skipping the image parsing in memory. If a preview is created once we just serve the data from that file. This saves precious RAM and CPU cycles.

Etag validation

By default we cache previews for 24 hours. However, after those 24 hours we would just request the same preview object again. While for a majority of the preview files nothing would have changed at all.

We now actually look at the headers a client sends us and if it is the same file (etag/last modified date). We just return the good old 304 status code. To indicate nothing has changed. We can do this by just accessing the database. So no need to go to the slow storage unless we have to actually serve preview data.

Limiting preview sizes

Let say you request a preview of an image of 250 by 250. But the next time you request an image of 252 by 252. Now it makes no sense to generate a new preview. We should serve similar preview sizes as the same file. There was already some code that handled this but we upgraded it in Nextcloud 11.

The algorithm we use now rounds your image up to the nearest power of 2. So you get at least an image of the size you requested but it might be a bit bigger. But your browser is also very good at resizing it a bit for you then. This makes sure that your disk does not fill up with 10K previews per file and that the server can often just serve the same file.

Shared previews

Up until now we would generate previews per user. So if Alice shared a folder full of their holiday pictures with Bob we could generate previews for both Alice and Bob. This separation lead to multiple issues:

  • Double the space required
  • Double the CPU cycles for preview generation
  • If Bob modified a file the preview of Alice would not get updated
  • When Bob opens the folder all the previews still have to be generated which requires him to wait until he can browse them

As of Nextcloud 11 we share previews. Which means that we have a single location to store previews. This solves the problems Alice and Bob had as described above.

Pre-generation

The downside of the new preview approach is that we need to drop all the existing previews. Because of certain bugs in the old preview system just moving stuff over is not possible.

To over come this we have been working on an app. This app allows you to do a one time run to generate all the previews.

However the app is capable of doing more. It will listen to writes and keep a list of all those files. Then once you run a command it will start requesting previews for all those files. This can make your overall experience more smooth.

That way you can lets your server generate previews during the night for example.

Get the app in the appstore.